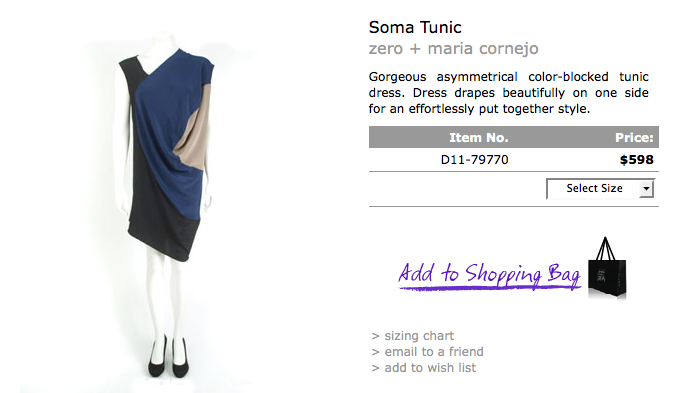
I'm so glad I'm blogging this endeavor because I got some great suggestions to improve my knock-off attempt of this dress
First though I want to give a shopping report. I went to one of my favorite fabric spots called "Pennsylvania Fabric Outlet" today to look for the 3 fabrics I want to use. I had previously tried out different ones in my stash but they were either the wrong color or type of fabric. Since the inspiration dress is made of silk I wanted a "silky" fabric that would drape nicely. Here is what I found:
These are all a good quality polyester woven and I think about as close as I'm going to come to matching the original (I'd never find silk in the right colors even if I could afford it!)
All of the comments I got had do with the fact that my last attempt seemed TOO drapey above the side inset seam and NOT Drapey enough below and I have to agree!
Shams of communingwithfabric suggested that I add a "slash-and-spread" to the bottom piece to give it some drape on the left too. Do you all think it would work if I "s&s" on each of the dotted pink lines in this drawing? Do they have the right angle?
I will incorporate these changes in my next muslin but meanwhile I've made my first stab at putting the 2 different inserts on the left side:
I can tell from this that the small insert is the wrong shape and the crummy yellow knit is not a good choice for nice draping! In my next muslin I will try to use woven, silky fabrics like I plan to have in the final design, plus adding more draping. Still having fun! more later---
A journal of my sewing and knitting adventures in which I try to make something a "little different" by using unusual patterns and materials.
Friday, May 6, 2011
Knock-off Contest design Part 3
After getting side-tracked with my last attempt to "knock-off" this design for the Pattern Review contest I was anxious to try again:
Although the inspiration model as 2 different colors of drapey "insets" in the left side I decided to start with just one. In order to give it more "drape" I used the following pattern idea to cut out the inset (adding seam allowances and markings on the curved edges)
I "slashed-and-spread" on the lighter blue lines which added 4-5 inches to the length of the side seam of the bodice, which would hopefully give it enough "drape".
Here is the result which I'm more satisfied with---I think the "Slash and Spread" is the right way to make an asymmetrical drape
My next step will be to put another smaller inset in the larger inset. Today I'm going shopping to try to find the right colors of blue and grey that match the inspiration picture----fabric stores here I come!
Although the inspiration model as 2 different colors of drapey "insets" in the left side I decided to start with just one. In order to give it more "drape" I used the following pattern idea to cut out the inset (adding seam allowances and markings on the curved edges)
I "slashed-and-spread" on the lighter blue lines which added 4-5 inches to the length of the side seam of the bodice, which would hopefully give it enough "drape".
Here is the result which I'm more satisfied with---I think the "Slash and Spread" is the right way to make an asymmetrical drape
My next step will be to put another smaller inset in the larger inset. Today I'm going shopping to try to find the right colors of blue and grey that match the inspiration picture----fabric stores here I come!
Thursday, May 5, 2011
Knock-Off Contest Part 2
After much thinking I've begun work again on my entry to the Pattern Review "Knock-Off Contest" in which I will attempt to copy this design
Using a basic 1 piece dress pattern (Butterick 5211) I first attempted to make one side "drape" by enlarging the pattern on the side like this (dotted lines)
I made it up in a stripe, thinking that it would really show up the drapy side
This was a disaster! It just looked lumpy and droopy on the left side instead of the graceful drape I had envisioned. But because I am trying to make all my knock-off "muslins" into something wearable I quickly cut it up and came up with this top which I like a lot better.
This is a fun shirt with that funky look I like, but I have gotten off track with my knockoff design!
I've decided I need to make an inset on the left side of the pattern like the inspiration design has. I will cut out an inset like this
Then, after adding seam allowances and careful markings to each piece I will "slash and spread" the pattern on the light blue lines. This will hopefully give me the "drape" I want on that left side . Stay tuned for my next muslin attempt in this "knock-off" contest----I having SO much FUN!!
Saturday, April 30, 2011
Knock-Off Contest Part 1
I have always been interested in "knocking off" unusual designer looks so was delighted when Pattern Review announced they would be running a "best knock-off contest" from May 1 to May 30.
Here is the design I want to knock-off:
We can't do any actual work on it til May 1 but I started selecting fabrics today. I went through all my blacks, dark blues, and greys to see which would be closest to the color of the dress, at least when photographed. Here's what I have to choose from:
I like the black on the top background and the grey on the bottom right. None of the blues seem the right shade so I might shop around some more for that.
Of course there is no pattern existing that is remotely like this so I'm going to have to experiment with some drafting and draping. First though, I wanted to get something that had the right neckline and sleeves. I used these patterns for inspiration for the off-center v neckline and different length sleeves.
I made up a muslin out of black knit, being sure to make the neckline vee point the same way as the original design.
I plan to use the pattern I made of the asymmetrical neckline and sleeves for my knockoff. This was the easy part though! Now I just have to figure out how to put that unusual drape with the blue and grey onto the dress----stay tuned for the next report. I'm loving this challenge!
Here is the design I want to knock-off:
We can't do any actual work on it til May 1 but I started selecting fabrics today. I went through all my blacks, dark blues, and greys to see which would be closest to the color of the dress, at least when photographed. Here's what I have to choose from:
I like the black on the top background and the grey on the bottom right. None of the blues seem the right shade so I might shop around some more for that.
Of course there is no pattern existing that is remotely like this so I'm going to have to experiment with some drafting and draping. First though, I wanted to get something that had the right neckline and sleeves. I used these patterns for inspiration for the off-center v neckline and different length sleeves.
I made up a muslin out of black knit, being sure to make the neckline vee point the same way as the original design.
I plan to use the pattern I made of the asymmetrical neckline and sleeves for my knockoff. This was the easy part though! Now I just have to figure out how to put that unusual drape with the blue and grey onto the dress----stay tuned for the next report. I'm loving this challenge!
Sunday, April 24, 2011
Almost a WADDER
Even though I've been sewing almost 50 years I still have my share of "wadders" (sewing language for a garment that is so bad it is WADDED up and thrown away), but they are usually about the wrong fabric/pattern selection or something that I knew was an experiment anyway. Rarely do I have a problem with fitting but that changed bigtime yesterday!
It all started with this poly/spandex fabric I got on my trip to Jo-Mar in Philly with some fellow sewing bloggers:
This is a scrap that has been cut down the middle but the large pink circles go down each side. It's pretty splashy but since I'm quite tall I usually like a big print. I did know that I'd have to pick a pattern carefully as I wanted something that didn't cut up the design very much. Also I wanted something asymmetric, with the pink running down just one side and NOT in the middle.
When I saw my friend Carolyn's blog post on the new Vogue Donna Karan dress 1250 I knew that's what I wanted to use.C's blog It was a simple design but an unusual pattern with just 2 odd shaped unusual pieces.
Carolyn always explains just how she adjusts the pattern and her final garment looked great so I cut mine out and started sewing. Though the size 20 should have fit me fine I even added some at the back seam since my fabric didn't have quite as much stretch as the pattern called for (note to self---This MATTERS!)
As she and others on Pattern Review had reported it was super easy to sew up, which I quickly did. There was really no intermediate point to try it on so I finished all the main seams before putting it on. What a NIGHTMARE! It was way too tight from the middle hip down. The cowl dropped down over my flattish bust making my waist appear to be the biggest point of my body. Since there were NO seams to take out through the skirt and I knew I'd never wear something this tight, it almost became the dreaded WADDER at this point. ( Guess I should have taken a "before" picture at this time but I couldn't stand to even wear it.)
After calming down, I decided it would be a great challenge to make it wearable so went back to the cutting table. I cut completely open the left side below the armhole and added a long godet---starting with about 4 inches at the bottom and tapering to nothing under the arm. (I had enough of the brown background fabric and the godet seams are barely detectable) This made a GREAT difference in the fit of the dress and I began to have hope. I also added bands to the capped sleeves, giving a little more width through the shoulders and covering more flabby upper arm.
Here's the result which I'm actually quite pleased with. I'm showing 3 ways of wearing the dress, both belted and not and with the cowl collar hanging loose and then secured on the side. Which do you like best?
Belted with cowl hanging down naturally which gives that horizontal fold just above the waist
No belt (hem pinned higher), cowl neck pulled over and secured on my right
Belted, cowl secured on my right side------------does it still need to be shorter?
I'd appreciate any comments and opinions you might have about belt, cowl and dress length----thanks!
It all started with this poly/spandex fabric I got on my trip to Jo-Mar in Philly with some fellow sewing bloggers:
This is a scrap that has been cut down the middle but the large pink circles go down each side. It's pretty splashy but since I'm quite tall I usually like a big print. I did know that I'd have to pick a pattern carefully as I wanted something that didn't cut up the design very much. Also I wanted something asymmetric, with the pink running down just one side and NOT in the middle.
When I saw my friend Carolyn's blog post on the new Vogue Donna Karan dress 1250 I knew that's what I wanted to use.C's blog It was a simple design but an unusual pattern with just 2 odd shaped unusual pieces.
Carolyn always explains just how she adjusts the pattern and her final garment looked great so I cut mine out and started sewing. Though the size 20 should have fit me fine I even added some at the back seam since my fabric didn't have quite as much stretch as the pattern called for (note to self---This MATTERS!)
As she and others on Pattern Review had reported it was super easy to sew up, which I quickly did. There was really no intermediate point to try it on so I finished all the main seams before putting it on. What a NIGHTMARE! It was way too tight from the middle hip down. The cowl dropped down over my flattish bust making my waist appear to be the biggest point of my body. Since there were NO seams to take out through the skirt and I knew I'd never wear something this tight, it almost became the dreaded WADDER at this point. ( Guess I should have taken a "before" picture at this time but I couldn't stand to even wear it.)
After calming down, I decided it would be a great challenge to make it wearable so went back to the cutting table. I cut completely open the left side below the armhole and added a long godet---starting with about 4 inches at the bottom and tapering to nothing under the arm. (I had enough of the brown background fabric and the godet seams are barely detectable) This made a GREAT difference in the fit of the dress and I began to have hope. I also added bands to the capped sleeves, giving a little more width through the shoulders and covering more flabby upper arm.
Here's the result which I'm actually quite pleased with. I'm showing 3 ways of wearing the dress, both belted and not and with the cowl collar hanging loose and then secured on the side. Which do you like best?
Belted with cowl hanging down naturally which gives that horizontal fold just above the waist
I'd appreciate any comments and opinions you might have about belt, cowl and dress length----thanks!
Friday, April 22, 2011
funky knitting
I love knitting almost as much as sewing and feel that it offers a chance to be creative too. Wearing an unusual sweater is a way I often use to spice up my every day jeans and turtleneck look. Sometimes I even knit a piece and sew an outfit to go around it (I'm working on a multi-color wardrobe for summer right now with this idea)
On a recent well-publicized road trip to fabric stores with several sewing blog friends, I got LOTS of knitting done between stops (NO, I wasn't driving!) Here are a couple of my new pieces---as you can see I like the funky and asymmetrical in knitting as much as sewing.
This was from a Plymouth yarns pattern called "Easy Kimono top"sweater pattern It is made from one of my favorite yarns called "Encore"---a reasonably priced wool-blend. Though I love all-wool yarn this is much more comfortable to wear in most seasons and doesn't look at all "man made" and plastic-y. I pretty much stuck to the pattern except to close it with an old style knitting needle.
This deconstructed looking sweater is from a free pattern on the Berroco yarn website montparnasse sweater I love the details of putting it together with seams on the outside and rolled edges. The only thing I added was the fringe ties. I used another wool-blend called "Wool Ease" from Lion Brand yarn. It has the same fiber make-up as the Plymouth Encore above but I don't like it as well (My best knitting buddy Diane has explained it all to me----something about the length of the wool fibers they start with making the Encore so much better).
I've had a little trouble getting my sewing mojo back since the 9+ days of fabric shopping and sewing talk but can feel it starting to arrive----I may just go cut out one of my new Vogue patterns now!
On a recent well-publicized road trip to fabric stores with several sewing blog friends, I got LOTS of knitting done between stops (NO, I wasn't driving!) Here are a couple of my new pieces---as you can see I like the funky and asymmetrical in knitting as much as sewing.
This was from a Plymouth yarns pattern called "Easy Kimono top"sweater pattern It is made from one of my favorite yarns called "Encore"---a reasonably priced wool-blend. Though I love all-wool yarn this is much more comfortable to wear in most seasons and doesn't look at all "man made" and plastic-y. I pretty much stuck to the pattern except to close it with an old style knitting needle.
This deconstructed looking sweater is from a free pattern on the Berroco yarn website montparnasse sweater I love the details of putting it together with seams on the outside and rolled edges. The only thing I added was the fringe ties. I used another wool-blend called "Wool Ease" from Lion Brand yarn. It has the same fiber make-up as the Plymouth Encore above but I don't like it as well (My best knitting buddy Diane has explained it all to me----something about the length of the wool fibers they start with making the Encore so much better).
I've had a little trouble getting my sewing mojo back since the 9+ days of fabric shopping and sewing talk but can feel it starting to arrive----I may just go cut out one of my new Vogue patterns now!
Monday, April 18, 2011
Great Week of Sewing Talk
I have just had the most wonderful week of my sewing life! I got together with 4 other sewer-bloggers and we took an amazing tour through all the fabric stores in Philadelphia, Baltimore and Washington. (all these bloggers have a much bigger following than I do so I'm sure if you've found mine you can figure out who they are!) They've done an excellent job of reporting on Fabric Mart, Jo-Mars, A Fabric Place (Michael's) and G St (all with pictures) so I won't go into that (but be assured I did my share of buying!)
So anyway, while I put all my new fabric away and think about what I want to do next, here is the last thing I made. It was my entry into the "Julie's Picks Contest" that Fabric Mart sponsored. Unfortunately it really wasn't very well publicised since it was only open to customers who were members of the "Julie's Picks Monthly samples club" The challenge was to use any of the fabrics ordered from the Jan or Feb mailers in your contest entry.
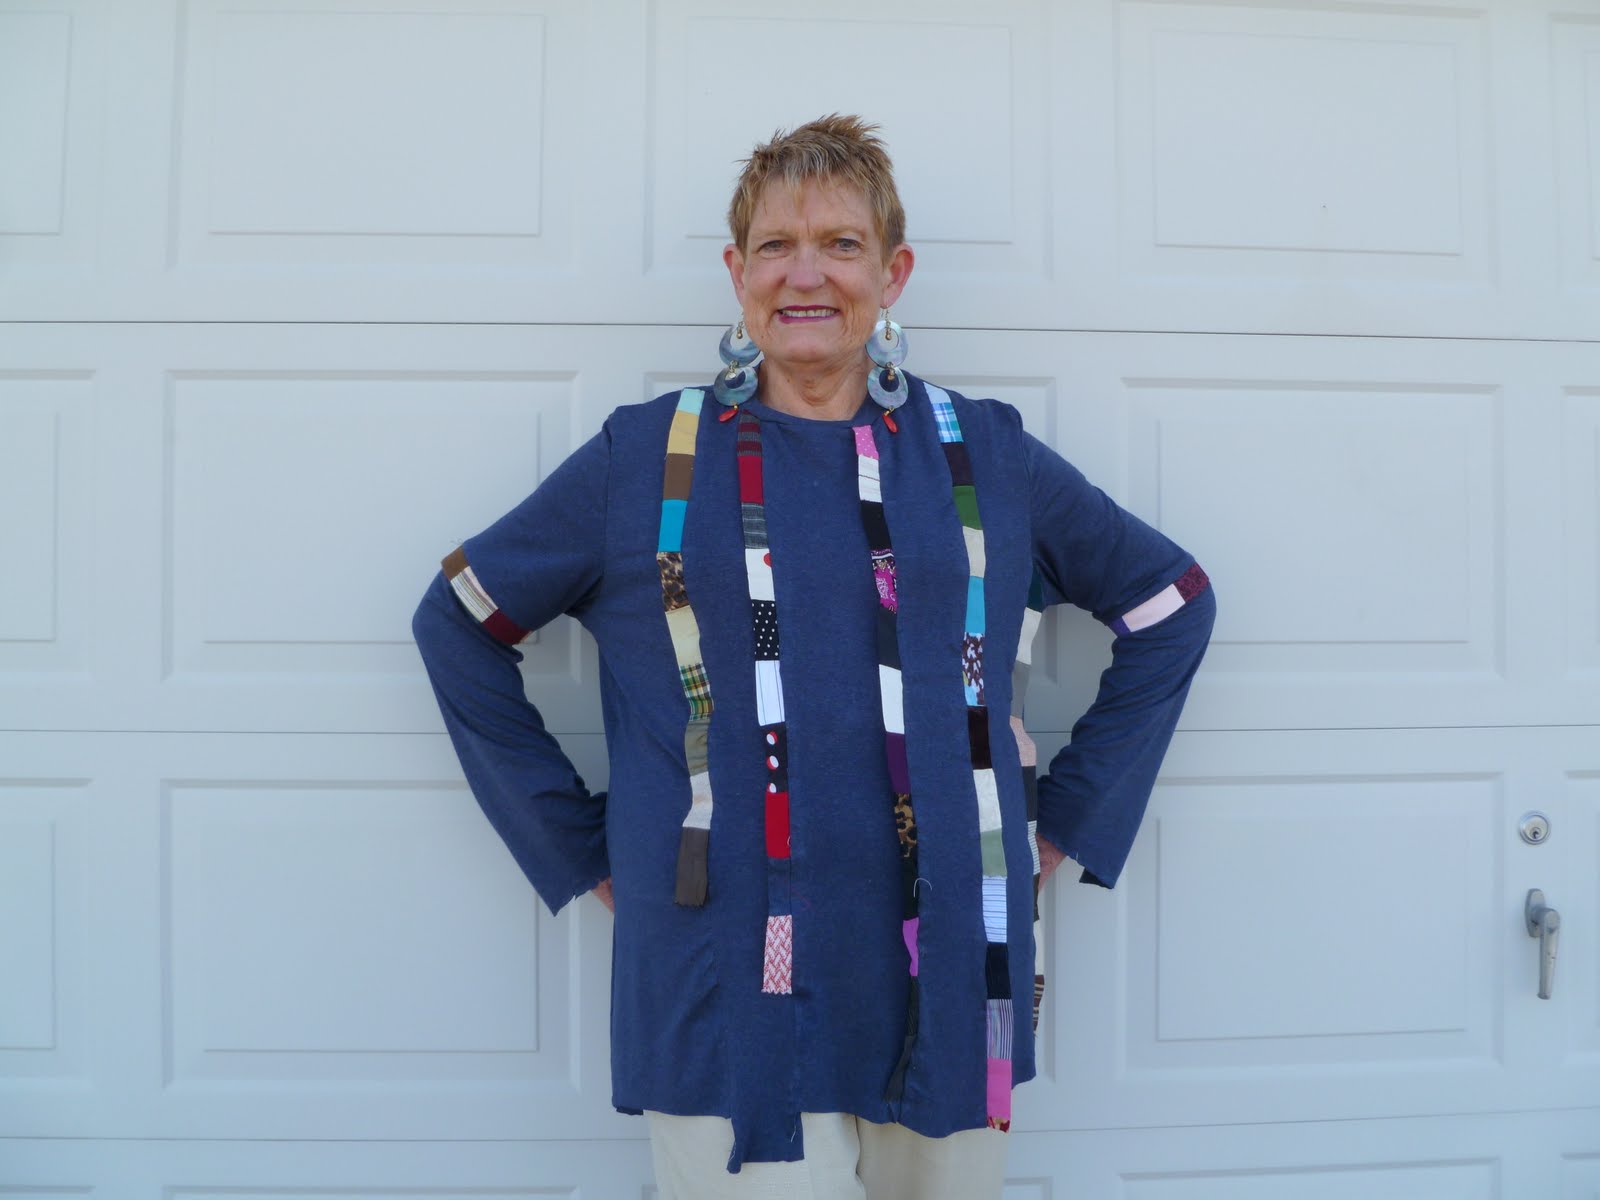
I decided to attempt to use all the little samples in a trim on the Marcy Tilton top (vogue pattern 8671). The basic blue knit was of course ordered from the samples too and worked up very nicely. I used techniques I learned in quilt sewing to put all the little samples together and then used these strips where plain ones were called for in the pattern.
If you want to see the other contestants in the contest and vote (before April 29) you can go here http://www.facebook.com/fabricmartfabrics#!/media/set/fbx/?set=a.10150550332635582.647413.277959930581 Vote by clicking on "like" for a particular picture.
Subscribe to:
Posts (Atom)